What gives a better feeling of food security than coming home to a house filled with the aroma of a pot on the stove? Or a slow cooker filling the house with a melange of odors of all the ingredients dumped into it? A pot on the fire, ready to dip into, has to be one of the big improvements that sedentary agriculture achieved compared to the lives of nomadic tribes.
While nomadic tribes could subsist reasonably well on a diet based on milk and meat, the addition of carbs from plants is what really allowed populations of farming communities to take off. And in the beginnings of civilization, plants were not as gentle to digest as our supermarket choices are today. If you have ever gathered wild onions or garlic, you may have noticed that they were quite a bit more fibrous than store-bought scallions. Or wild mustards with their stringy leaves and stems. All that fiber and all those carbs in the digestive system moved people from a starvation type metabolism to a metabolism that could pack on the pounds. This can be seen around the world when "aboriginal" people leave the hunter/gatherer ways of their ancestors and adopt a modern "civilized" diet -- the rate of obesity skyrockets as does the incidence of diabetes. It takes a few generations to adjust to rich living!
To ensure the continuation of our rich-living lifestyle, we need to be able to have those high quality vegetables available at all times. One way to do it is to take the advice of permaculturalists and plant a wide variety of fruits and nuts, trees and bushes that will start bearing early in the spring until late into the fall. If you have enough of a surplus during the growing season, you can dry, pickle, or preserve the excess bounty for use during the winter. In this post, I'd like to point out an alternative, having a large planting of one or two plants that can be the staples of a diet and that continually produce throughout the year.
A good example of this is taro (Colocasia esculenta). A good sized plot of taro, and you will have an unlimited supply of leaves for the stew pot and roots to either fry into chips or boil up to make poi. I'm still wondering if there is a good way to prepare the stems, or if they are best left as animal fodder. Even in cold climates, the taro corms stay viable in the ground, so if you have to, you can always go out in the middle of winter and dig up some carbs.
In a tropical climate like Hawaii, taro would be the only thing you need, but in my temperate climate, I have to think of something that I can pair it with that I can continually harvest during the winter. Collards. There is a reason that collards are the quintessential Southern side dish -- they keep growing during our winters and a patch of them in the garden can keep the kitchen supplied while the taro corms sit in the ground dormant.
A diet of just taro and collards could get pretty boring though. That's where some perennial herbs and onions come in handy. Rosemary, sage, wild garlic, mint, there is a long list of flavorings that can be grown in the kitchen garden to spice up these two staples.
If you are reading this blog to get ideas on how to improve your food security, ask yourself what plants are the reliable producers for your area. They may be weeds. My last entry talked about salsify and upland cress. I haven't given up on those two and I hope to naturalize them in the areas adjacent to my main garden. They, along with the taro, have grown like weeds and haven't suffered any insect attacks. I can't say the same for my collards, as they will on occasion be hit by a plague of harlequin bugs. But that doesn't make for a total loss, at least the harlequin bugs are easy to shake into a container to then toss into the chicken coop.
At one time I thought that Jerusalem artichokes would be a good choice for a perennial, always-available vegetable. I tried growing them for two seasons, but I had less than stellar results. I suppose if I had to, I could give it some more effort and make it work, but given how well the four that I have already mentioned do in my climate, I think I have settled on my staple greens.
Wednesday, July 2, 2014
Saturday, April 19, 2014
Which vegetables offer 'food security'?
I've slowly come to realize that modern industrial agriculture has shifted the public's taste to vegetables that require value added industrial processing, which is not the same thing as having food security. For example, while chicory is a leafy green available during the cool months of the year, Belgian endive is the same plant that has had some industrial processing done to blanch it of its bitterness. This blanching process ends up increasing the inputs to the crop without adding to the nutritional value of the final product.
Another example is broccoli versus broccoli raab. Growing a large, dense head of broccoli requires a specialized climate, which is why most of the broccoli in the country is grown in the area around Santa Maria, California. The raab version of broccoli, with multiple small heads, offers more in the way of food security because it can be cut several times over a longer period than the single cutting of the conventional broccoli crop. It can also be successfully grown in areas that do not have the narrow temperature range of the central California coast.
In planning a food security garden then, one has to discard vegetables with narrow growing requirements or industrial processing inputs and replace them with other crops that yield over a longer time period or can even be stored "in the field". My recent experience growing salsify (Tragopogon porrifolius) has led me to consider it as a very good candidate for a food security vegetable. Coming into last winter, I had a few salsify plants in the garden, and they handled the Arctic Vortex winter well, surviving the 12F low in January. They are now putting on some spring growth and coming into flower, and I have been cutting the immature flower buds and cooking them like asparagus, which they are akin to in flavor. In reading up on it, I've seen where it can be cut at all times of the year and that it doesn't increase in bitterness when it begins to flower. From a food security perspective, growing large heads of broccoli is a wasted effort, whereas keeping a patch of salsify well tended will provide a long-term harvest of flower buds, leaves, and roots.
Another good candidate is upland cress (Barbarea verna), also known as 'creasy greens'. This was also one that came through the winter unscathed, and even seemed to put on some growth. I've prepared it much as one would turnip greens, and to me, the flavor of creasy greens is preferable. It's also a decent addition to salads, giving them a little kick, something that I would never do with raw turnip greens.
Both upland cress and salsify are said to easily reseed themselves, but how they do that in my garden is still an open question. I am hoping that I can establish them on my hugelbeds so that they will be sustainable in the truest sense of the word. While these two vegetables receive little attention from industrial agriculture, I can see a definite need for them in a food security garden.
Friday, September 13, 2013
Hugelkultur in a stump
So my neighbor has had this dead tree snag next to his driveway for so long that it was threatening to fall over and block it. He decided a couple months ago that it had to go and fired up the chain saw. It didn't take long to get it down, and we carted it over to my hugelkultur staging area. Lots of rotten wood for me to build more mounds with!
But back to the stump that was left. There was a large cavity extending below grade, so I poured in a wheelbarrow load of sand, threw some squash seeds on top, and raked some of the rotted wood on top of it all.
Fast forward to today and what do we have?

That butternut squash is doing great! There are two vines running out of the top and the right side of the picture, each about 10' long with a hefty size squash. The only thing I could have done better would have been to add 2 wheelbarrow loads of sand to the stump. That's quite a bit of volume eaten away below the top of the stump.
Wednesday, September 11, 2013
Lingzhi, known in the west as Ganoderma.
I had some business to take care of in downtown Augusta, so I parked in the shade of a massive live oak tree and set out on foot. As I was walking, I noticed the stump of another live oak that had been cut at ground level quite some time ago. It had rotted away considerably, and in the center of it was a Lingzhi mushroom:
 What struck me about this particular specimen was that it had a rougher, alligator-skin like surface rather than the usual sanded-and-varnished appearance of most Ganodermas. There was no stem present, and the underside is pure white.
I've read about the medicinal properties of Ganoderma soup, maybe part of this one will have to get a bath in the crock-pot.

I've read about the medicinal properties of Ganoderma soup, maybe part of this one will have to get a bath in the crock-pot.
Thursday, August 1, 2013
Mystery mushroom
Here's a picture of a polypore that I scraped off of an old hickory stump. The tree had been cut down at least 5 years ago, and the stump is in the end stage of its rot. Any guesses as to the name?


Wednesday, June 26, 2013
How to plant acorns
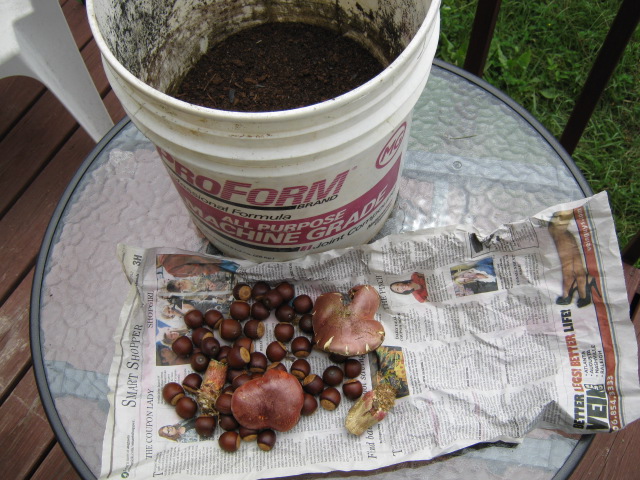
This was an experiment from last year that turned out far better than I expected. My starting materials were saw oak acorns I collected fresh off the tree in late August, and boletes from the shopping mall. No, they don't sell boletes at the shopping mall, they overmulch and overwater their oak trees in the parking lot, so right after a heavy rain, there is usually a new flush of them free for the collecting. Here's what I came home with.

The bucket contains a mix of 50:50 composted manure and peat moss, the acorns get dumped into the bucket, and then the boletes go into the blender with some water. The bolete gazpacho then goes into the bucket and it is time to plant some acorns.
Next post I will let you know how it turned out.
The bucket contains a mix of 50:50 composted manure and peat moss, the acorns get dumped into the bucket, and then the boletes go into the blender with some water. The bolete gazpacho then goes into the bucket and it is time to plant some acorns.
Next post I will let you know how it turned out.
Monday, June 10, 2013
May harvests
It's been a while since I last blogged, and in that time, I have had potatoes and peas to harvest. These were the last of the pre-hugelkultur crops I put in, and they had a hard time of it. A cold March meant that I waited until the end of May to harvest, unlike last year when the unseasonable warm winter had crops ready to harvest at the end of April. I really didn't put much effort into the potatoes and peas this year; most of my time was spent planning and preparing hugelbeets for the summer crops.
Variability of precipitation has been a readily apparent facet of our new climate. We had 2-1/4 inches of rain for the entire month of May, and in the first 10 days of June so far, we have had 6-1/4. One good thing about all the rain this last week: I scored big on a mushroom hunt today. I've come to the conclusion that the best place to hunt mushrooms, other than old growth forest, is at shopping malls. The reason is that they overmulch and overwater the trees in their parking lots, creating perfect conditions for fungal cultures. Today I was able to collect 4 different types of bolete, some non-descript Laccaria type, and some marble sized puffballs. I also came across a near picture perfect specimen of Amanita muscaria, save for the fact that the cap was a shade of yellow rather than red. Perhaps it was due to age and the color had not developed yet, as there were several in the area and most were still in their button stage.
I brought home a good haul from this mycological cornucopia, and I'm going to use them to fix the front yard. I planted some semi-dwarf apple, plum, and pear trees in the front yard in 2010 and so far they have been disappointing -- failing to set fruit and just surviving, certainly not thriving. I have gotten a good stand of crimson clover to grow in this area, so I'm puzzled as to why the trees are lagging. What I am going to try is a mixture of retro-hugelkultur and heavy mulching with a fungal drench.
"Retro-hugelkultur" is a technique I developed that uses a garden hose and decaying branches about an inch in diameter. First you go around the area with the hose and use the water pressure to drill holes into the ground. Depending on what you run into, the hole can be 8" to 2' deep. Then you shove the decaying branch into the hole, maybe giving it a good tap with a sledge hammer. Not exactly the way to go about doing real hugelkultur, but it's faster with less soil disturbance.
I've already put 4 to 6 of these 'hugelsticks' around my fruit trees, and today I finished mulching them with a 50:50 mix of wood chips and aged horse manure. To top it off, I put my mushroom haul through the blender, added it to some aerated compost tea to which I had previously added some blended biochar, and drenched the mulch with this inoculant. Now to wait and see what the results are.
Subscribe to:
Posts (Atom)